Showing posts with label DIY. Show all posts

Monday, February 27, 2017

DIY Magnetic Picture Hanger

Ever since I got back to painting, I have been looking for exciting and inexpensive ways to hang my art. I first saw these wood frames on Pinterest and instantly fell in love. I just had to make one for myself but without breaking the bank! 

I am so stoked at how these turned out and I love how easy it is to change my artwork whenever I want without the hassle that comes with boxed frames. So if you are like me and love switching artwork then read on to learn how to make these for yourself. The best part, you can create this in whatever size you want!  

Materials: 
Artwork
Four pieces of Balsa wood
Magnetic strip
Cutter 
String
2 Eye Screws


Begin by cutting and sanding your balsa strip to the size you want. You will need four strips.


Next,  grab a cloth and stain the wood in your choice of color. I went with "coffee bean" by Pascol.


Allow the stain to dry then cut and glue magnetic strip on one side of the wood. Repeat with the remaining three strips.


Then take one of the wood strip and measure half inch in from either ends and mark. Twist eye screws into the points you just marked until fully in. 


Thread your string through the eye screws and tie a knot. Optional- you can add beads or any other ornament before you tie the knot.


Now lay the piece with the eye screws down so that the side with the magnetic strip is facing up. Lay your artwork on top, straight and centered. Then place another strip on top so that the two magnets are facing each other. Do the same for the bottom of your artwork. And that's it: your beautiful wall art is all set to hang.
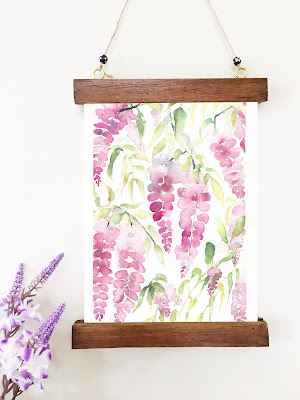
Wisteria

I hope you enjoyed the tutorial. If you love the Wisteria painting above, you might enjoy looking at more in my previous post

Have a lovely week! xx

P.S: If you followed this tutorial to create your very own picture hanger, then please do share. I would love to see it! :)


Tuesday, January 31, 2017

Nature Inspired Summer Tablescape

Hi friends!


Get excited because I have a really fun summer tablescape post for you. And you can easily pull it off without spending a dime! Believe me. All you need to do is look around the house for can-be-turned-into-decorations treasures. Because that's exactly what I did.


I was recently inspired by Arhaus to share post-holiday tablescape ideas, and I had the perfect excuse to do some decorating but without spending any dollar. (Btw you should check them out. They have some amazing, swoon-worthy pieces. Oh boy, I would love to have one of these!!!)

I decided to go for a colourful nature inspired theme and built the whole tablescape around it. Summers is, after all, all about sunshine and dining alfresco. And colorful butterflies. 


I decided to use bright summery colors like yellow and pink. I looked through my stash of craft fabric for a piece that could be turned into a runner and found one that went perfectly with my summer theme! To make the print pop, I decided to layer it - so out came my white quilt cover, a perfect backdrop to what I had in mind!

Next, I surrounded the runner with faux leaves garland and painted yellow and pink butterflies and added them to the garland. If you don't have artificial leaves garland, you can easily make one with green paper cut in the shape of leaves and stitched together. You can also add fairy lights to the garland for that extra oomph for when the sun goes down.

For napkins, I simply wrapped left over crepe paper from Inaya's Little Birdie themed first birthday party, added twigs, leaves and a yellow butterfly to complete the look.


Common household items like sauce jars, tins and bottles made perfect vases for leaves, flowers and um some fabric flowers. And when placed inside a basket they made a perfect centerpiece, ideal for any table.


I again used a jar to act as a cutlery holder and added some grey stones.


Lastly, I hung lanterns and added candles for a magical evening. And that is it, you are done with summery bright tablescape setting. Was't it easy?  I just love how it all came together from things already in my home.


Since I love you guys so much for following my little blog, here are some more ways to go about setting a fresh summer table.


Simply add some paint to water to achieve this look. 


You can create this with scattered stones, fresh flowers in a bottle, tea light candles, and leaves inside a jar. You can also add some twinkle lights along with leaves for a magical effect. 


I hope you enjoyed this post as much as I had fun creating it for you guys. I would love to hear your thoughts so please leave some love by commenting below.


Cheers until next time! xx

Florals


Tuesday, January 17, 2017

Leafy Watercolor Valentine Heart Tutorial

With Valentine's Day quickly approaching, it is never too early to start preparing for it.


If you are looking for a diy and something that involves paints (and color other than red:p) then I have just the tutorial for you.  You can either frame the final painting or turn it into a card for your loved ones. 

To create your very own leafy valentine heart art, gather the following supplies:

Watercolor paper 
Brushes
Green watercolor paint (or your preferred color)
Tracing paper 

Begin by printing out your leafy heart template


Transfer the leaves onto your watercolor paper using a tracing paper.


Next, grab some green paint and start painting. I painted the leaves using both wet on wet and wet on dry wash technique. You can learn more about the techniques here and here. Or check out the little video of me painting these leaves here


Let your painting  dry. And that's it. Wasn't it easy? You can play with colors, go for an ombré look or add text on top with acrylic paint. The possibilities are endless once you let your imagination flow :)


I hope you enjoyed the tutorial. Stay tuned for another easy-peasy one with some florals this time.

Cheers until next time xx

More V-day projects that I have done in the past, that might inspire you. Simply click on the picture to be taken to the relevant project post.


Friday, October 28, 2016

Little Birdie Themed Birthday Party With Free Printables

YOU GUYS
I have been dying to share this with you!


You know how much I love diys.
And how much I love to do party decor on a budget.
Like this one here.
And here.

So when Inaya was turning one, I wanted her first birthday to not only be special but also memorable - involving lots of home made decorations and home baked goodness. Why go store-bought when you can go all-out diy, right? I decided to keep "Little Birdie" as the main theme (after all she is called chirya (birdie) by her beloved Aunt. I also wanted the colours to be soft, so I picked soft blues and pink and designed her birthday card.


I got chart papers and some lovely patterened papers from the craft store and used them to create the decor. I started out by designing the "Happy Birthday" banner.


Followed by "I am 1".


I used a styrofoam to create "1" sign


And used random boxes, toilet paper cardboard rolls and plastic cups to support some of the decor on the table. I found a really nice template for small bird house here and created my own for the bigger ones.


I made cute little buntings and tied them to skewers.


I designed toppers for the cupcakes on Photoshop, printed them out on normal printer paper and taped each to a toothpick. 


Some of the props for photo booth I designed on photoshop myself and the rest I found online.


Once I was done with the decor I got working on the desserts. Since we had invited a lot of people for the event, and having never baked for so many people before I decided to do two cakes instead of a tiered one. Besides, assembling a tiered cake seemed too complicated. I already knew how I wanted  the cakes to look so I just needed an awesome recipe for both.


Luckily the recipes I followed turned out amazing. Both the cakes were soft, moist, luxurious and simply DELICIOUS. I kept receiving compliments on how amazing they tasted! (Will share recipes in my next post)


It was a great party. We all had fun especially the little one.

If you are planning to throw a bird themed party for your little one or for someone you love, then you have come to the right place. Get clicking below for awesome freebies and don't forget to link back :)

 xx


click here to download "photobooth"