Showing posts with label CRAFTS. Show all posts

Monday, February 27, 2017

DIY Magnetic Picture Hanger

Ever since I got back to painting, I have been looking for exciting and inexpensive ways to hang my art. I first saw these wood frames on Pinterest and instantly fell in love. I just had to make one for myself but without breaking the bank! 

I am so stoked at how these turned out and I love how easy it is to change my artwork whenever I want without the hassle that comes with boxed frames. So if you are like me and love switching artwork then read on to learn how to make these for yourself. The best part, you can create this in whatever size you want!  

Materials: 
Artwork
Four pieces of Balsa wood
Magnetic strip
Cutter 
String
2 Eye Screws


Begin by cutting and sanding your balsa strip to the size you want. You will need four strips.


Next,  grab a cloth and stain the wood in your choice of color. I went with "coffee bean" by Pascol.


Allow the stain to dry then cut and glue magnetic strip on one side of the wood. Repeat with the remaining three strips.


Then take one of the wood strip and measure half inch in from either ends and mark. Twist eye screws into the points you just marked until fully in. 


Thread your string through the eye screws and tie a knot. Optional- you can add beads or any other ornament before you tie the knot.


Now lay the piece with the eye screws down so that the side with the magnetic strip is facing up. Lay your artwork on top, straight and centered. Then place another strip on top so that the two magnets are facing each other. Do the same for the bottom of your artwork. And that's it: your beautiful wall art is all set to hang.
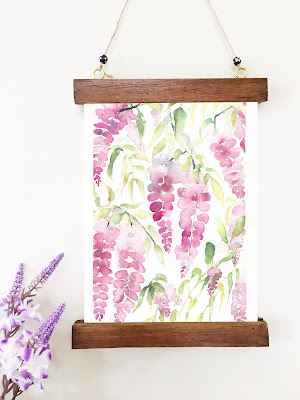
Wisteria

I hope you enjoyed the tutorial. If you love the Wisteria painting above, you might enjoy looking at more in my previous post

Have a lovely week! xx

P.S: If you followed this tutorial to create your very own picture hanger, then please do share. I would love to see it! :)


Friday, October 28, 2016

Little Birdie Themed Birthday Party With Free Printables

YOU GUYS
I have been dying to share this with you!


You know how much I love diys.
And how much I love to do party decor on a budget.
Like this one here.
And here.

So when Inaya was turning one, I wanted her first birthday to not only be special but also memorable - involving lots of home made decorations and home baked goodness. Why go store-bought when you can go all-out diy, right? I decided to keep "Little Birdie" as the main theme (after all she is called chirya (birdie) by her beloved Aunt. I also wanted the colours to be soft, so I picked soft blues and pink and designed her birthday card.


I got chart papers and some lovely patterened papers from the craft store and used them to create the decor. I started out by designing the "Happy Birthday" banner.


Followed by "I am 1".


I used a styrofoam to create "1" sign


And used random boxes, toilet paper cardboard rolls and plastic cups to support some of the decor on the table. I found a really nice template for small bird house here and created my own for the bigger ones.


I made cute little buntings and tied them to skewers.


I designed toppers for the cupcakes on Photoshop, printed them out on normal printer paper and taped each to a toothpick. 


Some of the props for photo booth I designed on photoshop myself and the rest I found online.


Once I was done with the decor I got working on the desserts. Since we had invited a lot of people for the event, and having never baked for so many people before I decided to do two cakes instead of a tiered one. Besides, assembling a tiered cake seemed too complicated. I already knew how I wanted  the cakes to look so I just needed an awesome recipe for both.


Luckily the recipes I followed turned out amazing. Both the cakes were soft, moist, luxurious and simply DELICIOUS. I kept receiving compliments on how amazing they tasted! (Will share recipes in my next post)


It was a great party. We all had fun especially the little one.

If you are planning to throw a bird themed party for your little one or for someone you love, then you have come to the right place. Get clicking below for awesome freebies and don't forget to link back :)

 xx


click here to download "photobooth"

Saturday, December 15, 2012

Paper snowflakes

It's December! How about some paper snowflakes to celebrate winter? 


All you need is a square piece of paper and a  pair of scissors.


And now comes the FUN part: unfolding the snowflake!


tada!


Why stop here? Make a few more..


and string them up on your door.


TIPS


Dip the edges of snowflakes in glitter and attach them to your windowpanes. Or glitter them in golden, green or any color to coordinate with your mayoun theme!


or simply use them to embellish Christmas presents!


Happy snowflake making! x

Friday, November 30, 2012

Sesame Street paper pennant banner tutorial

As promised, I am back with another tutorial and guess what I’ll be sharing with you guys today!

Hint: you see them at birthday parties and showers


That’s right....paper PENNANTS :d


They are definitely a raging trend right now and look so fabulous..


and cuteeee…


and add some extra oomph to the decor!


For my nephew’s first birthday, I made Sesame Street paper pennant banner for the occasion. Based on his favorite book, Clang-Clang! Bang-Bang! , we kept Sesame Street as the theme and incorporated some of the characters from it into the decor. I used scenes from his book as well as images of characters off the internet to hand-paint a 78" by 42" fabric banner..


how cute are the twiddlebugs!

.. happy birthday paper pennant banner...


..decor for the table and curtains...


..a door sign..


and even made an award ribbon for the birthday boy! (p.s: this is not an original idea. I saw several online so decided to make one myself. I will post a tutorial on how I made it in the future.)


The entire process was fun and a bit crazy as well since I was making the entire party decor from scratch! Crazy right?! But it was a labor of love and I enjoyed every moment of it and wouldn't mind doing it again for him! 

So let’s get back to the tutorial on how to make your own paper pennant banner. Using the template provided below you will be able to whip one up in no time.

Okay so here’s what you need:


First download the Pennant Template, save and print it out.

Cut out the template and keep it aside. You will be using this as a pattern to cut your colored A4 papers. 

Next lay out your paper..


and fold it in half like so…


Use the pattern to trace and cut your first two pennant pieces. Simply repeat this step for however many you need for the banner.


Next score along where the dotted line is on the template, fold and tape.


The space you just created is where your ribbon will go through.  I like to score with the curved portion of my ruler. If you are doing the same, make sure you don’t push too hard at it or you might risk tearing off the paper.


Now draw and paint sesame street characters in the center of each piece and let dry before moving on to  the next step.


Thread ribbon through your pennants and leave enough at either end to make hanging easy.


That’s it! You are all ready to hang up your sesame street banner and wow your guests!


TIPS


Stencil the pennants, cut out letters for "happy birthday' and paste 


or print template directly on decorating paper, cut, glue ribbon and hang


Have fun creating your own!