Pages

Saturday, December 29, 2012

Painting: recreating Starry Night

Remember how I mentioned in this tutorial I was busy with projects? Well here is one of those projects that has kept me busy.


Looks familiar?


That's right! I recreated one of Vincent van Gogh's most famous painting Starry Night on a 24 inch wide and 18 inch high canvas for my sister.


She was quite persistent about wanting this particular one. 


At first I was a bit hesitant, and quite rightly so since the last time I made an actual painting was way back in 2006 (or was it 2007?). And I had never worked on a canvas before!


Anyhow, I decided to do the painting in acrylics since it's a faster medium to work with. 


And love how it turned out!


This is one painting I enjoyed replicating and I found the colors, 
the swirls and the entire composition quite therapeutic. 


In fact, working on Starry Night removed the block in my head that had developed due to time spent in a business school.


The painting now hangs in my sister's room and has received so many compliments!


Would love to hear what you guys think.


Have a lovely weekend!


Monday, December 24, 2012

Accordion-pleated paper flower and Christmas tree garland

Deck the halls with boughs of holly,
Fa la la la la, la la la la
Tis the season to be jolly,
Fa la la la la, la la la la 
  
Christmas is just around the corner and thinking about it brought back memories of school and the fun we used to have as kids around this time of the year. 


There would be the much awaited Christmas play, rehearsals and if you were lucky you would be part of it which meant missing classes. So I always made sure I was in the play, no matter how small (or mute:p) the part! Then there would be Christmas carols  and school party where the lower grades got to show off their classrooms which were decked up with stockings, hollies, bells and what not made by little hands to the rest of the school. And let's not forget the much longed for holidays and break from school! 


So I thought I will do two tutorials today. In the first we will make accordion style paper flowers and in the second we will use that technique to create a Christmas tree garland. So lets begin.


Accordion-pleated paper flower.

Gather the following supplies:  2 pieces of square paper, scissors, pencil, ruler and a stapler. 


Mark one inch from the corner and make a fold. 


Use your first fold as a guide to make more accordion style folds. Remember how we used to make paper fans as kids? You are using the same technique here, but it has been given a more fancy name- so simply fold and flip, fold and flip..


until it is folded up like this:


Now cut off the ends in a pointed or rounded shape or leave as it is. Fold it in half and staple the ends together (you can also glue it or use a clear tape). Do the same with your other piece of paper so that you have two half circles.


Simply staple the two halves together to form a full circle and you are almost done.


To cover the center of the circle, pretty it up with a button, lace or a fancy piece of scalloped paper.


And that's about it. You just made your self an accordion style paper flower. 


Christmas tree garland

You will need: 

Red wrapping paper cut into 5 inch squares
Green card stock cut into 4 inch squares
Cream card stock cut into 3 inch circles (and if you want the circle to show from behind the tree, cut 5 inch or larger circles. You'll know what I am talking about in a bit.)
Stapler/tape/glue
UHU petafix (available at any stationary shop)


Grab your red squares and using the first tutorial make accordion flowers. I kept half inch wide accordion folds.


Now glue your circles to the center of each paper flower.


Next take your green card stock and draw a Christmas tree. I roughly drew a christmas tree on one, cut it out and used the template to draw and cut the rest. Once you have your trees cut out..


Take out your UHU petafix and following the manufacturer's instructions fix it to the circle like so:


Next, attach your trees to it.


Grab some twine, ribbon or whatever you'd like to use and tape it on the back of your flowers.


And you are ready to hang your garland.


Enjoy!


x

Sunday, December 16, 2012

TUTORIAL: Paint your own totes


I am so happy to be sharing with you this project. I have been super busy with family, guests and other projects this past week. And when I found a cotton tote lying around in the house, plain and unused, I thought to myself: that's it. Time to bring my fabric paints out. 


So take out your fabric paints and get ready to customize and cute up some totes! They are perfect for filling library books.


Carrying groceries.


Or just a cute bag for on the go.


Let's get started. You will need:

  1. Cotton tote or any blank tote
  2. Fabric paints
  3. Sponge brush
  4. Masking tape
  5. Ruler

Lay your tote flat on your work surface and place a foam sheet inside. If you don't have a foam sheet, you can use plastic or thick cardstock or anything that serves the purpose of preventing the paint from seeping through to the other side.


Next, mark your stripes along the side seams. Measure one inch and mark. Continue marking every one inch so that you have one inch wide stripes.


Then grab your masking tape and tape off the one inch stripes. You'll be filling the spaces between the tape with paint. Also mask off a one inch border all around.


Mix a custom color to your liking and use your sponge brush to paint the stripes. 


Wait a few minutes for the paint to dry then peel off the masking tape. Now cover the painted stripes with masking tape and fill the new spaces thus created in another color. Paint the straps in the same way. Allow the paint to dry then carefully remove all the tapes.


Remove foam. Turn the bag inside out and heat set the paint.


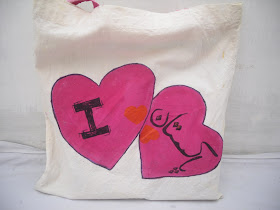
Try this: Hand-paint two hearts in pink and outline them using black fabric maker.


Allow the paint to dry then write your text inside. Paint two more hearts inside in contrasting color. Heat set the whole thing and you are good to go!


Go grab some totes from the market and personalize them!